I already have existing servers, but I figured it would be best to build an entire Media System which stands alone and try to make it as small, efficient and automated as possible. This way, the system can be replicated and used at friends houses etc as a relatively plug-n-play solution. Plus, the simpler I keep it with as much automation as possible the easier it is to explain how to use it to other members of my family and friends.
- So the top requirements are:
- Small form factor
- Energy efficient
- Cheap to build
- Linux-based
- Large storage capacity
- Network connectivity
The project comprises of multiple distinctly separate functional components, which fit and work together as a whole. Each component listed below requires a certain level of knowledge about either hardware, electronics, programming, Linux OS, carpentry/woodworking or a combination. As a whole I would say the difficulty of the project would be somewhere between ‘Intermediate’ and ‘Advanced’ but only because the knowledge required is across a wider scope than many of my other projects. Each separate components difficulty I would rate at only around ‘Intermediate’ at most. These components are listed below with what I consider the level of required knowledge:
- Hardware [1/5]
- Networking [1/5]
- Linux OS [4/5]
- BASH Scripting [3/5]
- Building simple electronic circuits [2/5]
- Arduino programming [3/5]
- Chassis building [3/5]
Once all the pieces are cobbled together we will have a device which:
- Runs Transmission. A BitTorrent downloader
- Runs CouchPotato. A movie downloading front-end to search and manage downloads
- Runs SickBeard. A TV series downloading front-end to search and manage downloads
- Runs MiniDLNA. A service which streams all media content to any compatible device
- Runs OpenVPN. This instance runs as a client to a server I have in USA, allowing us to stream USA-only services like Netflix (click here for related blog entry)
- Runs Squid Proxy. Used for any devices on the network to proxy their traffic through which is then source-routed through the VPN tunnel to USA
- Runs OpenVPN. This instance runs as a server to allow remote connections to the network. This isn’t needed for media services, but is handy to have
- Networking configured so that certain services are accessible from the local network and/or internet
- Monitors temperature of the machine and triggers a fan if temperature passes a threshold
- Uses an LCD screen to show temperature, running service status and other alarms
Hardware
For the hardware I needed something small and efficient to run Linux. There are plenty of ARM-based solutions in the market with the Raspberry Pi being the most popular. Unfortunately though, the RasPi doesn’t have SATA support nor does it possess the amount of power I would like.
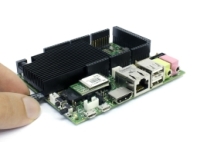
Ultimately, I settled on using a UDOO (www.udoo.org).
For $135USD (plus shipping) I received this small form factor ARM-based quad-core board with built-in SATA and wired/wireless network. It also has Arduino built-in and you can communicate via a serial connection in both directions between the ARM and Arduino processors, which is pretty darn awesome when you think about it (more on that later!).
UDOO started off as a Kickstarter project not long ago and has made huge progress. However, I would still consider it a bleeding edge technology; which is to say that although the UDOO community exists, it is still in its infancy and you may need to do some of your own hacking to get some things working.
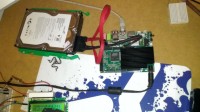
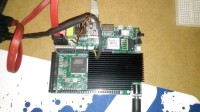
If you have any hardware experience at all, then you will find the UDOO mostly straight-forward. The tricky part is powering up your hard drive. At first I had a 2.5″ (smaller) hard drive which only requires 5v which is obtained from the red/black wires you see on the left side of the picture below. I later changed the disk to a larger capacity 3.5″ (larger) hard drive. These require 12v and 5v. The 12v is obtained from the yellow/black wires on the right side of the same picture. Don’t know how to wire up a SATA power plug? click here (note: You do not need to supply the 3.3v wire at all)
Click here to continue to the next part of the tutorial [Hardware and OS]


March 2, 2014 at 6:59 pm
Reblogged this on kilohm.
LikeLike
January 15, 2015 at 9:54 pm
Hi Eddy, here’s UDOO Team and we shared this article on our social media channel. You did such a great work! Why don’t you share your beautiful project on http://udoo.hackster.io/ All the community will benefit of this!
Cheers
LikeLike
January 15, 2015 at 10:22 pm
Thanks Andrea. Will do! Keep up the GREAT work with UDOO! 🙂
LikeLike
January 15, 2015 at 10:30 pm
Seems like my UDOO project is already up on hackster 🙂
LikeLike
January 20, 2015 at 11:17 pm
Hi there, have you read my messages below?
Not to be rude, but when are you going to release the project on udoo.hackster.io? The other NAS on Hackster.io powered by UDOO is not cool as yours! Trust me, it deserves to be showcased 🙂
LikeLike
January 16, 2015 at 2:40 am
Hi Eddy,
I’m very happy you like our work! I totally lost your answers, sorry. I was adding the project on your behalf, obviously not as the author 🙂 If you claim the project, it will be yours so you can finish what I was writing, modify it or whatever you like. The project is “UDOO Media System”.
Cheers,
and let me know if you encounter any problem!
LikeLike
January 16, 2015 at 2:59 am
I finally realized the project which you are talking about is not the one I was adding, because it was private, so you couldn’t see the project. You’re probably talking about “DIY Nas with Open Media Vault” I think, but as you told, your project is not a simple Nas, it’s far far more!
Anyway, finally I deleted it, so you can do the choices you prefer. However, this is what I wrote so far, mainly lurking from your guide which I found really useful:
ABOUT THIS PROJECT
Here it is a complete, standalone and efficient media system based on UDOO Board designed to be an easy plug-n-play solution.
REQUIREMENTS
The target users are also non-tech savvy people, thus the top requirements are:
1. Small form factor
2. Energy efficient
3. Cheap to build
4. Linux-based
5. Large storage capacity
6. Network connectivity
A bit of knowledge in hardware, chassis building, networking, Linux OS, BASH Scripting, building simple electronic circuits, Arduino programming is required.
OBJECTIVES
Our device will finally be able to:
Run Transmission. A BitTorrent downloader
Run CouchPotato. A movie downloading front-end to search and manage downloads
Run SickBeard. A TV series downloading front-end to search and manage downloads
Run MiniDLNA. A service which streams all media content to any compatible device
Run OpenVPN. This instance runs as a client to a server the author has in USA, allowing us to stream USA-only services like Netflix (click here for related blog entry)
Run Squid Proxy. Used for any devices on the network to proxy their traffic through which is then source-routed through the VPN tunnel to USA
Run OpenVPN. This instance runs as a server to allow remote connections to the network. This isn’t needed for media services, but is handy to have
Networking configured so that certain services are accessible from the local network and/or internet
Monitors temperature of the machine and triggers a fan if temperature passes a threshold
Uses an LCD screen to show temperature, running service status and other alarms
HARDWARE
To fulfil the requirements a board able to run Linux OS was required.
Raspberry Pi would be the obvious choice for many, but as far as it doesn’t have SATA, UDOO Quad Core has been the natural choice, also due to his high power.
LikeLike
January 21, 2015 at 9:20 am
Hi Andrea. I’ve added the project to the hackster UDOO page. See here: http://www.hackster.io/aristocles/media-system-with-lcd-screen-and-temp-sensor
Thanks and keep up the good work! 🙂
LikeLike
January 21, 2015 at 11:00 pm
Hi there! I wrote you a message on Hackster.io. Check it out please 🙂
LikeLike
October 28, 2016 at 2:10 pm
I can see that your main focus is on UDOO. If you have trust in them, I will go to their website right now and check it out. but I will need you to explain in details the requirement you mentioned because I am new to this.
LikeLike
October 28, 2016 at 2:40 pm
My full project is featured on the UDOO website (here: https://udoo.hackster.io/aristocles/media-system-with-lcd-screen-and-temp-sensor-cc1d27?ref=channel&ref_id=497_published___tutorial&offset=36). You can get a list of the parts there. You will also find my project on http://www.hackster.io but it is very similar information as the UDOO one.
LikeLike